Replication: configure and manage a replica set in a MongoDB environment


MongoDB Replica Set vs. MongoDB Cluster
A replica set creates multiple copies of the same data set across the replica set nodes. The basic objective of a replica set is to:
Increase data availability
Provide a built-in backup solution
Clusters work differently. The MongoDB cluster distributes the data across multiple nodes using a shard key. This process will break down the data into multiple pieces called shards and then copy each shard to a separate node.
The main purpose of a cluster is to support extremely large data sets and high throughput operations by horizontally scaling the workload.
The major difference between a replica set and a cluster is:
A replica set copies the data set as a whole.
A cluster distributes the workload and stores pieces of data (shards) across multiple servers.
MongoDB allows users to combine these two functionalities by creating a sharded cluster, where each shard is replicated to a secondary server to provide high data availability and redundancy.
Dealing with replication delay
A major concern when it comes to configuring replication is the replication delay (lag). This refers to the delay in the replication process to a secondary node after an update to the primary node in the replica set.
A certain replication lag while replicating large data sets is normal. Still, the following factors can increase the replication delay, negating the benefits of an up-to-date replication:
Network latency. As you are dealing with multiple MongoDB instances residing in different servers during replication, the primary communication method will be the network. If the network is insufficient to cater to the needs of the replication process, there will be delays in replicating data throughout the replica set. Therefore, it is better to always route your traffic in a stable network with sufficient bandwidth.
Disk throughput. If the replication nodes use different disk types (e.g., the primary node uses SSD while secondary nodes use HDD as disks), there will be a delay in replication since the secondary nodes will process the write queries slower compared to the primary node. This is a common issue in multi-tenant and large-scale deployments.
Heavy workloads. Executing heavy and long-running write operations on the primary node will also lead to delays in the replication process. So, it’s best to configure the MongoDB Write Concern correctly so that the replication process will be able to keep up with the workload without affecting the overall performance of the replica set.
Background tasks. Another important step is to identify the background tasks such as server updates, cron jobs, and security checkups that might have unexpected effects on the network or disk usage, causing delays in the replication process.
Database operations. – Some database queries can be slow to execute, while some might take a considerable time to execute. Using a database profiler, you can identify such queries and try to optimize them accordingly.
Configuring the Replica Set
The above sections have covered all the important theories related to replication. Next, let’s configure a replica set using MongoDB instances installed on three Ubuntu servers.
Setting up the environment
Each Ubuntu server will have its own MongoDB instance with the standard MongoDB port 27017 accessible through the firewall. MongoDB recommends using logical DNS hostnames instead of IP addresses when configuring replica sets in production environments. That is to avoid disruptions in communication within the replica set due to changes in IP address.
You can update the /etc/hosts file to assign hostnames to each server in a test environment. There, you have to add the below-mentioned hostnames as the hosts indicating each node and reboot each server to load the new configuration.
Run The command-
/etc/hosts
10.10.10.56 mongodb-node-01
10.10.10.57 mongodb-node-02
10.10.10.58 mongodb-node-03
Starting the MongoDB Instance
Before starting the MongoDB instance, you need to modify the config file in each server to reflect the IP address and indicate the replica set. Let’s make the following modifications in each mongod.conf file.
mongodb-node-01
# network interfaces
net:
port: 27017
bindIp: 127.0.0.1,mongodb-node-01# replica set
replication:
replSetName: replicasetMain
mongodb-node-02
# network interfaces
net:
port: 27017
bindIp: 127.0.0.1,mongodb-node-02# replica set
replication:
replSetName: replicasetMain
mongodb-node-03
# network interfaces
net:
port: 27017
bindIp: 127.0.0.1,mongodb-node-03# replica set
replication:
replSetName: replicasetMain
After the updates are completed, restart the mongod service in each instance to reload the configurations.
sudo systemctl restart mongod
Initializing the Replica Set
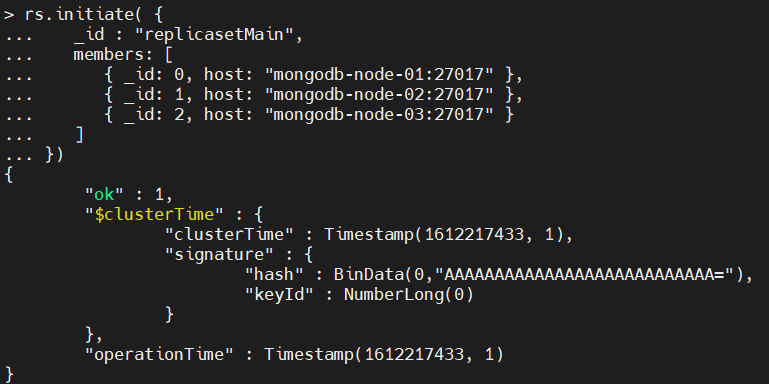
You can initialize a replica set using the rs.initiate() method. This method is only required to be executed on a single MongoDB instance in the replica set. Within the initiate method, you can specify the replica set name and member. These details must match with the configurations you made in each config file in the previous step.
rs.initiate( {
_id : "replicasetMain",
members: [
{ _id: 0, host: "mongodb-node-01:27017" },
{ _id: 1, host: "mongodb-node-02:27017" },
{ _id: 2, host: "mongodb-node-03:27017" }
]
})
Result:
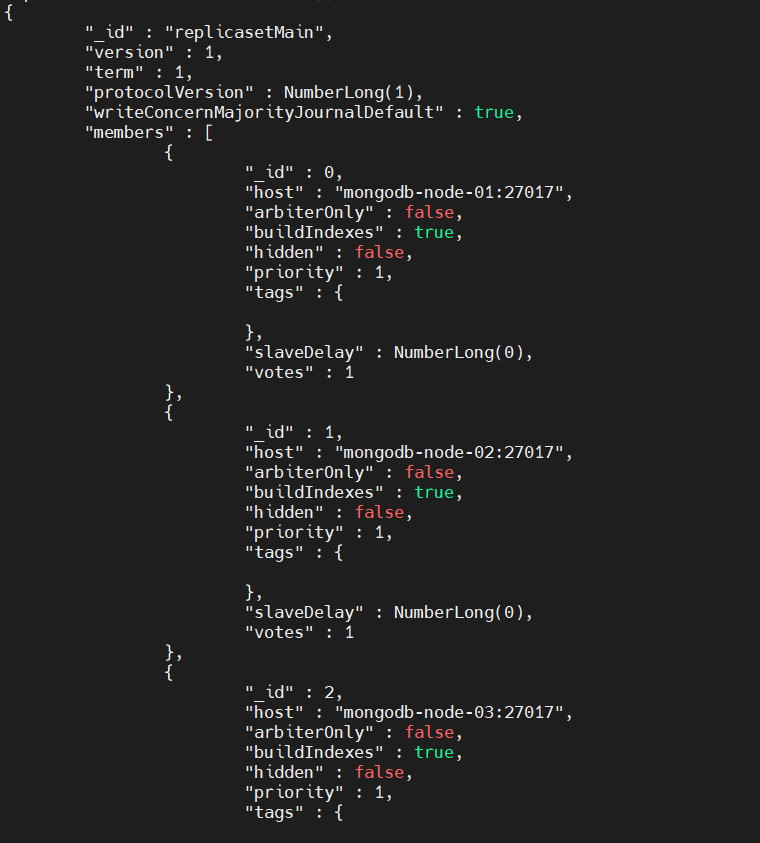
Using the rs.conf() command, you can view the replica set configuration as shown below.
rs.conf()
Result:
Validate Data Replication
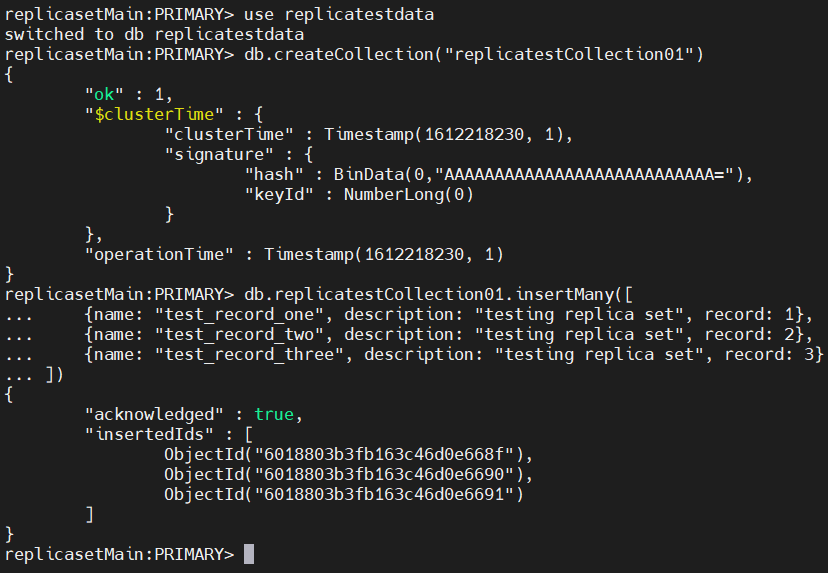
Now that you’ve configured the replication set, the next step is to validate the replication process. To do that, first login to the primary MongoDB node in the replica set.
Then you need to create a collection with some sample data using the following commands:
use replicatestdata
db.createCollection("replicatestCollection01")
db.replicatestCollection01.insertMany([
{name: "test_record_one", description: "testing replica set", record: 1},
{name: "test_record_two", description: "testing replica set", record: 2},
{name: "test_record_three", description: "testing replica set", record: 3}
])
Result:
Next, log in to a secondary node and check if the data is replicated. An important thing to note here is that, by default, read queries are disabled in secondary nodes. So, you need to enable them using the following command.
db.getMongo().setSecondaryOk()
After that, you can search for the data and verify if they are replicated well to the secondary node.
show dbs
use replicatestdata
show collections
db.replicatestCollection01.find().sort({record: 1}).pretty()
Result:
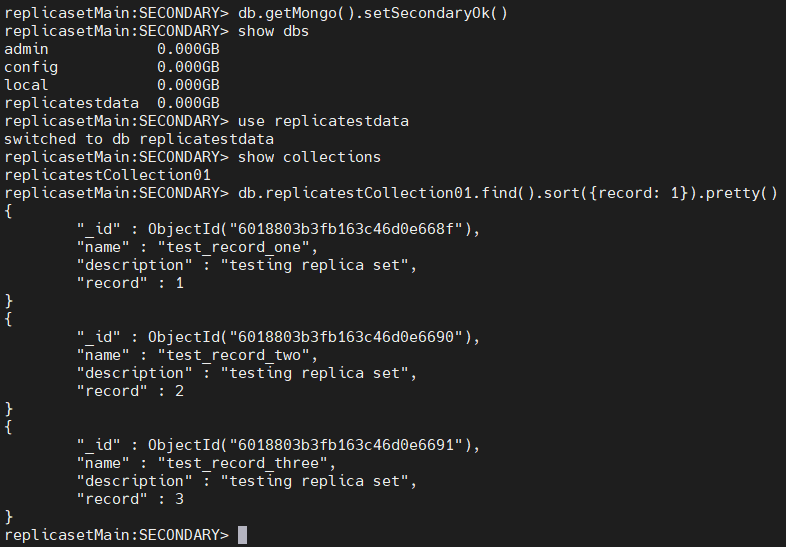
The above result indicates that the data of the primary node was successfully replicated to the secondary instances.
Adding a new node to the Replica Set
Using the rs.add() command, you can add a new node to an existing replica set.
Before adding a new node, you need to configure it. For that, modify the mongd.conf file to indicate the replica set and restart the mongod service.
mongodb-node-04
# network interfaces
net:
port: 27017
bindIp: 127.0.0.1, mongodb-node-04# replica set
replication:
replSetName: replicasetMain
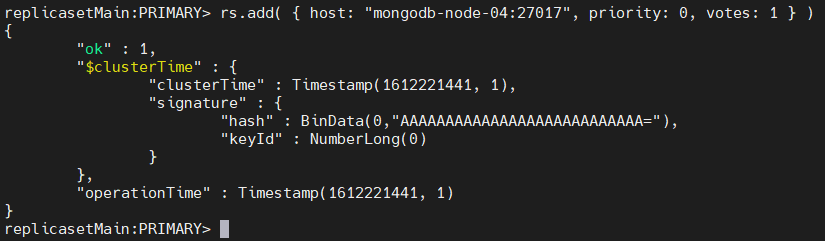
Then, go to the primary node of the replica set and run the add() command with the parameters listed below.
host refers to the IP address or the hostname of the new node.
priority indicates the relative eligibility of the new node to become the primary node. (priority 0 means that the node cannot become the primary node under any circumstance.)
vote indicates if the node is capable of voting in elections to select the primary node.
rs.add( { host: "mongodb-node-04:27017", priority: 0, votes: 1 } )
Result:
he above command will add a new node to the replica set. You can verify if the new node has been added by using the rs.status() command, which will display the details of the new node.
rs.status()
Result:
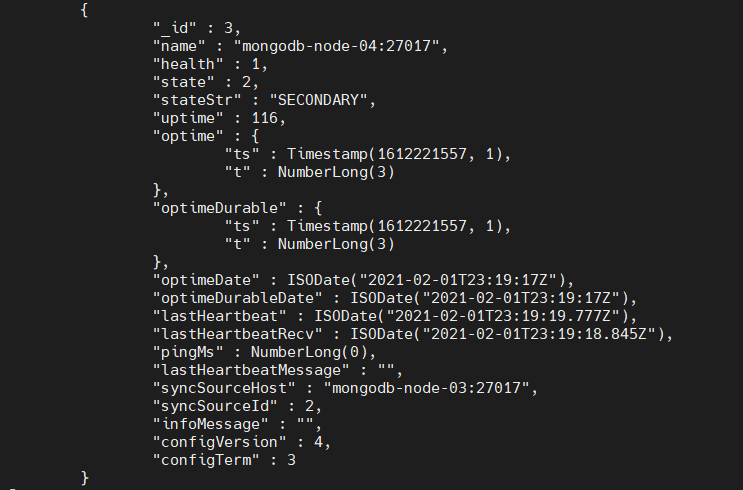
Finally, the data in the other nodes will be automatically replicated to the new node.
Removing a node from the Replica Set
The rs.remove() command can be used to remove a node from the replica set. You need to shut down the server instance before attempting to remove a node. When removing, you can specify which node should be removed using the name of that node.
rs.remove("mongodb-node-04:27017")
Result:
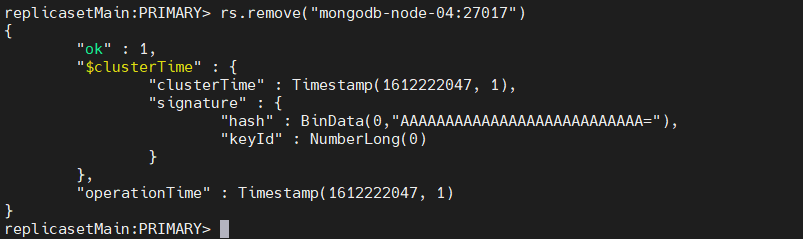
This result indicates that the node was successfully removed from the replica set.